Thursday, October 18, 2012

Cisco Packet Tracer 5.3.3 Slackware 14.0 Installation!

You are Cisco Network Academy member and want to install Cisco Packet Tracer on Slackware 14.0. Unfortunately, only Ubuntu (*.DEB) and Fedora (*.RPM) Packet Tracer download options exist officially, but it is possible to install it on different GNU/Linux distributions including Slackware. Follow this guide to achieve this!

If your system based on 64-bit, you firstly need to switch to multilib for installing Cisco Packet Tracer. (For switching to multilib, look at end of the guide.) 


To download Packet Tracer, you need to log in to Academy Connection (you must be a registered Networking Academy student, alumni, instructor, or administrator).

1. After logging into Academy Connection, select the Packet Tracer graphic to download. Then you will be redirected to the downloads page.


2.  Click on Cisco Packet Tracer Program Downloads link under Software Downloads sub-section.


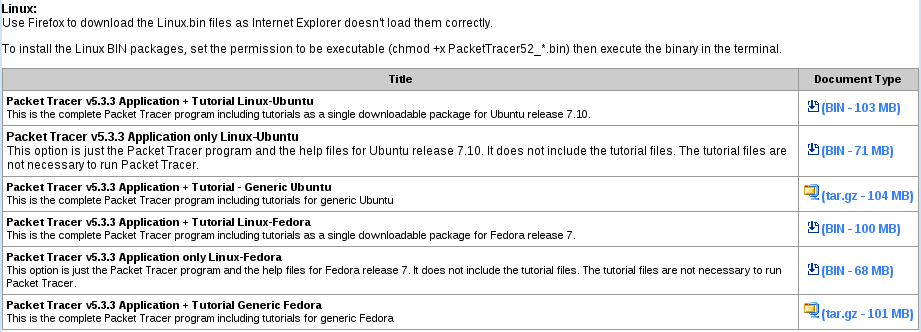
3. Installing Packet Tracer 5.3.3 from Generic Fedora *.TAR.GZ file, simply by executing install script in it, destroys Slackware 14.0 /etc/profile file. If you do not have a backup of this file, you will need to edit /etc/profile file manually to fix command prompt settings. To avoid this result, we will use *.BIN file instead of *.TAR.GZ file. Now, download "PacketTracer533_i386_installer-rpm.bin" binary file adapted for GNU/Linux Fedora including tutorials.


4.  Open a terminal emulator and change current directory to where downloaded "PacketTracer533_i386_installer-rpm.bin" file locates.


5.  Now, we will extract native Fedora RPM package in BIN file by initializing setup.


Become root,


su


Change file permissions,

chmod 755 PacketTracer533_i386_installer-rpm.bin


Run binary file,

./PacketTracer533_i386_installer-rpm.bin

After running binary file, content of the "PacketTracer533_i386_installer-rpm.bin" file will be extracted to /tmp folder.


6.  Now, for viewing EULA (End User License Agreement), you will be asked to press the ENTER key.


7.  Do not press the ENTER key, just abort the installation by CTRL+C key combination.


8.  Go to /tmp/selfextract.XXXXXX folder ("XXXXXX" is the value assigned by your computer.)


If there is no another /tmp/selfextract.XXXXXX folder in /tmp folder, below command will take the command prompt to the directory where the extracted Fedora RPM package locates.


cd /tmp/selfextract.*


9.  Using RPM2TGZ tool, convert RPM package to TGZ package.


rpm2tgz PacketTracer-5.3_3-u.i386.rpm


10.  Install TGZ package generated by RPM2TGZ tool by using INSTALLPKG tool.


installpkg PacketTracer-5.3_3-u.i386.tgz


11.  Now, we need to add executable symbolic link of Cisco Packet Tracer to /usr/bin directory to be able to start program from command line interface shortly by packettracer command.


ln -s /usr/local/PacketTracer5/packettracer
 /usr/bin/packettracer

12.  Return to user command prompt by exit command.


exit


13.  Start Cisco Packet Tracer as user by packettracer command.


packettracer


IMPORTANT NOTE: If your system based on 64-bit, you firstly need to switch to multilib for installing Cisco Packet Tracer!


To switch multilib with 32-bit compatibility on Slackware64 14.0 using Eric Hameleers' packages and guide;


1. open a terminal emulator,

2. download the complete Slackware 14.0 multilib folder.


lftp -c 'open http://slackware.com/~alien/multilib/ ; mirror 14.0'


3. become root,

su


4. change directory to the downloaded multilib packages' folder. 


cd 14.0


5. upgrade your 64bit Slackware gcc and glibc packages to their multilib versions, 


upgradepkg --reinstall --install-new *.t?z


6. install 32-bit compatibility packages to support all the 32-bit programs, 


cd *-compat32

upgradepkg --install-new *-compat32/*.t?z


7. add below lines to /etc/slackpkg/blacklist file for blacklisting all off multilib and 32-bit compatibility packages against updated by slackpkg tool,

#
# This one will blacklist all alien packages: 
[0-9]+alien
#

For further information about multilib, look at here!

Friday, October 12, 2012

Install VLC Media Player using SBOPKG VLC Queue File!

VLC Media Player 

Large Orange VLC media player Traffic Cone Logo

VLC is a free and open source cross-platform multimedia player and framework that plays most multimedia files as well as DVD, Audio CD, VCD, and various streaming protocols.

For compiling VLC and its dependencies using a series of automated SlackBuild scripts under Slackware 14.0;
  1. firstly install SBOPKG from here simply using PKGTOOL, if there is no SBOPKG installed on your system, 
  2. create a plain TEXT file and rename it as "vlc.sqf", 
  3. copy the below green lines including ordered dependency package names into "vlc.sqf" file and save, 
  4. open a terminal emulator and become root by su - command (not plain su), 
  5. copy "vlc.sqf" file, you just created, to "/var/lib/sbopkg/queues", 
  6. run SBOPKG by sbopkg command, 
  7. synchronize SBOPKG with the remote repository, 
  8. load saved "vlc.sqf" queue file to SBOPKG by activating the selection using SPACE Key.  
  9. and process the loaded queue, 
  10. finally, have a fun with VLC Media Player :). 
Content of the VLC Media Player SBOPKG Queune File (vlc.sqf) - Slackware 14.0:
------ cut from here ------
libebml
speex
orc
libmp4v2
libcuefile
libreplaygain
lame
x264
a52dec
faad2
twolame
lua
portaudio
libass
libavc1394
libdc1394
libdca
libdvbpsi
libdvdcss
libdvdnav
libiconv
libmatroska
libmodplug
libmpeg2
libshout
libupnp
live555
schroedinger
vcdimager
faac
musepack-tools
ffmpeg
vlc
------ cut from here ------


Saturday, October 6, 2012

Try Mayan Calendar Themed Lilo Splash!


su
cp /usr/doc/lilo-23.2/sample/slack14.0.2012.bmp /boot
nano /etc/lilo.conf
Replace the line  bitmap = /boot/slack.bmp with bitmap = /boot/slack14.0.2012.bmp and save file.
lilo
reboot


Friday, October 5, 2012

Compilation of 3.5.4 Linux Kernel on Slackware64 14.0

Hello Slackers;

I bought a new notebook (Ivy Bridge Micro-Architecture) and installed Slackware64 14.0 running on long term supported 3.2.29 Linux kernel. After installation, everything was good. A new notebook, a new release and a new kernel... While studying on Slackware in the next hours, OS suddenly freezed. Then, I experienced again the same thing a few more times. After googling the problem, I saw that many people had experienced the same problem on Ivy Bridge Platform using 3.2.x Linux kernel. Upgrading 3.2.x kernel to 3.5.x completely solved the freeze problem for me.

Below, I explained that how 3.5.4 linux kernel simply compiled and installed along side the 3.2.29 Linux kernel on Slackware64 14.0 using "config-huge-3.5.4.x64" kernel configuration file in "/testing/source" directory of the official Slackware tree (or Slackware installation DVD). You can also use one of the other kernel configuration files depending on your choice and os architecture.

For switching to the new kernel 3.5.4, open a terminal emulator and run the following commands correspondingly.

mkdir -p /usr/src

cd /usr/src

su

wget http://www.kernel.org/pub/linux/kernel/v3.0/linux-3.5.4.tar.bz2

tar -jxvf linux-3.5.4.tar.bz2

rm linux-3.5.4.tar.bz2

rm linux

ln -s linux-3.5.4 linux

cd linux-3.5.4

Remove any existing kernel configuration file.

make clean

make mrproper

Download the kernel configuration file. (For Slackware 14.0 32-bit, download "../config-huge-3.5.4") 

wget http://mirrors.slackware.com/slackware/slackware64-14.0/testing/source/config-testing-3.5.4/config-huge-3.5.4.x64

mv config-huge-3.5.4.x64 .config

For additional kernel options, configure the kernel source by "make menuconfig" command and save the configuration.

make menuconfig

make all

make modules_install

cp arch/x86/boot/bzImage /boot/vmlinuz-huge-3.5.4

cp System.map /boot/System.map-huge-3.5.4

cp .config /boot/config-huge-3.5.4
cd /boot
rm System.map

ln -s System.map-huge-3.5.4 System.map

nano /etc/lilo.conf

Add following lines, to create your new kernel section,  into "/etc/lilo.conf" file above or below the default kernel section by replacing X with your root partition device number and save.
image = /boot/vmlinuz-huge-3.5.4
  root = /dev/sdaX
  label = 3.5.4
read-only
Finally run "lilo" command and reboot system.

lilo
reboot

After booting into new kernel, you can check your new kernel version by: 

uname -r

Output of "uname -r" command should be "3.5.4".

For further information about kernel compilation, look at here and here.

Take care!