Monday, June 22, 2009

VNC Based Free Remote Control Software "TightVNC"

VNC (Virtual Network Computing) is a client/server sotfware which allows you to view desktop of a remote computer (VNC server) and control it from your computer (VNC viewer) with your local mouse and keyboard. VNC can be installed on any type of operating system (Unix, GNU/Linux and Windows). VNC also has a java viewer package for viewing a remote computer's desktop within a browser without installing software. It does not matter whether two computers have the same OS or not, VNC viewer and VNC server interact regardless of OS type.


Picture Source: http://www.realvnc.com/

VNC Based Free Remote Control Software "TightVNC"

TightVNC is a free, GPL licensed and enhanced version of VNC sofware. For detailed information look at TightVNC information page.

Currently Slackware-curent has TightVNC package in /extra section. You can also obtain TightVNC slackbuilds for Slackware 12.0, 12.1 and 12.2 versions on Slackbuilds.org.

Now I am going to explain how to establish desktop connection between two Linux machines on the same LAN.

TightVNC server machine: GNU/Linux Ubuntu (192.168.2.5)
TightVNC client machine: GNU/Linux Slackware

Install TightVNC server and TightVNC viewer on Ubuntu by:

sudo apt-get install tightvncserver
sudo apt-get install tightvncviewer

After installing TightVNC package on both machines (server and client), execute below command from user terminal of server machine (the computer you want to view its desktop) to start VNC server.

vncserver

After executing above command you will be prompted to create server access password for first time. Create a secure password and start server. After starting VNC server, an X desktop will be started with a specified number.

user@ubuntubox:~$ vncserver

New 'X' desktop is ubuntu:1

Starting applications specified in /home/user/.vnc/xstartup

Log file is /home/user/.vnc/ubuntu:1.log

user@slackbox:~$

VNC server started an X desktop with number "1". Now server computer is ready for clients.

To have desktop access on server machine through TightVNC, execute below command on your computer (client machine).

vncviewer local_ip_of_vncserver_machine:desktop_number

For my case;

vncviewer 192.168.2.5:1

After executing above command you will be prompted to enter server's access password. Enter password and enjoy!


Wednesday, June 17, 2009

X11 forwarding over SSH in Slackware

SSH is a program for logging into a remote machine and for executing commands on a remote machine. It is possible to run X Window graphical applications over SSH also. X forwarding allows you to run remote X applications that open their windows on your local display.

To establish an X Window connection over SSH:

1. Make sure that openssh package has installed and ssh service is active on both server and client machines.
(OpenSSH is free version of SSH)

2. Login to server machine (remote computer) using SSH

ssh remote_user_name@remote_machine

and edit remote computer's /etc/ssh/sshd_config file as remote root adding following lines and save.

AllowTcpForwarding yes
X11Forwarding yes
X11DisplayOffset 10
X11UseLocalhost yes


3. Restart ssh service on remote machine by executing following command as remote root.

/etc/rc.d/rc.sshd restart

4. On client machine (your computer), edit /etc/ssh/ssh_config file as root adding following lines and save.

ForwardAgent yes
ForwardX11 yes


5. To establish SSH connection with configured remote machine, execute following command from an X Terminal Emulator.

ssh -Y remote_user_name@remote_machine


6. After logging into remote machine, execute below command to check the value of display variable in remote host environment.

echo $DISPLAY

If you do not see anything when typing above command, set value by executing:

export DISPLAY=localhost:10.0

Now try to launch an X application on remote machine from client machine, for example:

xlogo &

* /etc/ssh/sshd_config and /etc/ssh/ssh_config files have required lines for X11 forwarding in commented form as system default. Instead of adding new lines, just uncomment related lines and check parameters.

* You need to open port "22" on remote network for WAN connections over SSH.

Thursday, June 11, 2009

Parted Magic (A Free Partitioning Tool)

Parted Magic is a mini OS (v4.1 is about 90 MB) mainly aims to partition hard drives using GParted and Parted programs. Partition Image, TestDisk, fdisk, sfdisk, dd and ddrescue are the other programs included by Parted Magic. Parted Magic supports the following file systems: ext2, ext3, ext4, fat16, fat32, hfs, hfs+, jfs, linux-swap, ntfs, reiserfs, reiser4, and xfs. You can operate Parted Magic from CD, USB storage, HDD and PXE server. For more information, look at the documentation page on Parted Magic homepage.


Friday, June 5, 2009

Ndiswrapper in Slackware

Sometimes native Linux drivers are not available for some network cards, because some vendors do not release specifications of the hardware for their wireless network cards. Ndiswrapper is an Open Source Project Software by which unsupported wireless network devices can be used on Unix-like operating systems using Microsoft Windows drivers.

I have a wireless USB network card (Airties WUS-300) which does not have Linux driver. I can find only Windows driver on vendor's support page. But, it is possible to use this USB wireless network card in Slackware with Ndiswrapper.

Installing "Airties WUS-300 Wireless USB Network Stick" driver with Ndiswrapper in Slackware 12.2

1. Build and install "ndiswrapper" package from SlackBuild.org. For building instructions read HOWTO page.

2. Extract Windows driver of your wireless network card and then be sure about that you have extracted ".INF" file.

(Some Windows drivers are distributed as compressed content of CD image and include "autorun.inf" file. Be carefull, this is not the file that we need!)

(Some other Windows drivers are in the form of ".exe". If you are lucky, unrar or unzip will extract ".exe" files on GNU/Linux. But sometimes these tools do not extract ".exe" files, in this case you need a Windows box and Universal Extractor which is an Open Source Software to extract any type of archive including ".exe" files.)

3. Open a terminal emulator and change your directory to where ".INF" file is located.

4. Now using ".INF" file, install wireless card driver by executing below command.

# ndiswrapper -i file_name.INF

(Replace file_name with the name of your ".INF" file)

5. Check whether installation was done correctly or not by:

# ndiswrapper -l


6. Load ndiswrapper kernel module by executing:

# /sbin/modprobe ndiswrapper


7. Executing

# ndiswrapper -m

writes an alias for "wlan0" into module configuration file /etc/modprobe.d/ndiswrapper so that ndiswrapper kernel module is loaded automatically when this interface is used.

8. Restart "wlan0" interface by:

# /etc/rc.d/rc.inet1 wlan0_restart

9. Execute below command to see whether your device has an available interface or not.

# iwconfig

If you do not see anything related with your wireless card, remove wireless card from computer and plug in, then execute iwconfig again.

10. To make ndiswrapper kernel module load on every boot add following red line to /etc/rc.d/rc.modules file.

/sbin/modprobe ndiswrapper

11. Now you need to configure your wireless network interface "wlan0". You can configure network manually but there is a software which is called "Wicd" configures network instead of you. Wicd is available in the /extra section of Slackware 12.2. Download Wicd package and simply install it by installpkg.

After installing Wicd, launch program by executing:

$ wicd-client &

Set default wireless interface as "wlan0" from "Preferences > General Setting > Wireless Interface" and connect to your wireless network.


As a Slackware fun sometimes I get annoyed with using Wicd, because you loose direct control on system and you can not learn anything about network configuration except Wicd. This is inconsistent with the Slackware philosophy.

Thursday, June 4, 2009

Revolution OS


Revolution OS Homepage

REVOLUTION OS tells the inside story of the hackers who rebelled against the proprietary software model and Microsoft to create GNU/Linux and the Open Source movement.

On June 1, 2001, Microsoft CEO Steve Ballmer said "Linux is a cancer that attaches itself in an intellectual property sense to everything it touches."

Microsoft fears GNU/Linux, and rightly so. GNU/Linux and the Open Source & Free Software movements arguably represent the greatest threat to Microsoft's way of life. Shot in cinemascope on 35mm film in Silicon Valley, REVOLUTION OS tracks down the key movers and shakers behind Linux, and finds out how and why Linux became such a potent threat.

REVOLUTION OS features interviews with Linus Torvalds, Richard Stallman, Bruce Perens, Eric Raymond, Brian Behlendorf, Michael Tiemann, Larry Augustin, Frank Hecker, and Rob Malda. To view the trailer or the first eight minutes go to the ifilm website for REVOLUTION OS.

Companies such as Hewlett-Packard, IBM, Oracle, Wipro, Ogilvy & Mather, OSTG, and Dreamworks Animation have rented REVOLUTON OS for private theatrical screenings. It has also screened in numerous film festivals including South By Southwest Film Festival, the Atlanta Film & Video Festival, Boston Film Festival, and Denver International Film Festival. REVOLUTION OS won Best Documentary at both the Savannah Film & Video Festival and the Kudzu Film Festival.

REVOLUTION OS is available in the 35 mm motion picture format and runs 85 minutes.

Source: http://www.revolution-os.com/

Activating Unicode/UTF-8 Support and Changing Default Locale Language in Slackware

For a list of locales which are supported by your Slackware box, type:

$ locale -a

If you have full installation of Slackware, all languages will be listed.

To get UTF-8 support, edit lang.sh file as root by:

# nano /etc/profile.d/lang.sh

Comment default locale and add uncommented line

export LANG=en_US.UTF-8


to lang.sh file as in below.

#!/bin/sh
# Set the system locale. (no, we don't have a menu for this ;-)
# For a list of locales which are supported by this machine, type:
# locale -a

# en_US is the Slackware default locale:
# export LANG=en_US

export LANG=en_US.UTF-8

# 'C' is the old Slackware (and UNIX) default, which is 127-bit
# ASCII with a charmap setting of ANSI_X3.4-1968. These days,
# it's better to use en_US or another modern $LANG setting to
# support extended character sets.
#export LANG=C

# There is also support for UTF-8 locales, but be aware that
# some programs are not yet able to handle UTF-8 and will fail to
# run properly. In those cases, you can set LANG=C before
# starting them. Still, I'd avoid UTF unless you actually need it.
#export LANG=en_US.UTF-8

# Another option for en_US:
#export LANG=en_US.ISO8859-1

# One side effect of the newer locales is that the sort order
# is no longer according to ASCII values, so the sort order will
# change in many places. Since this isn't usually expected and
# can break scripts, we'll stick with traditional ASCII sorting.
# If you'd prefer the sort algorithm that goes with your $LANG
# setting, comment this out.
export LC_COLLATE=C

# End of /etc/profile.d/lang.sh


After modifying lang.sh file, save it and reboot your computer.

To change your computer's locale language, replace "en_US" with your locale code "tr_TR, en_GB, en_CA, etc..." in lang.sh file and save, then reboot your computer.

Wednesday, June 3, 2009

Open Source Map


Open Source Activity Map | Open Source Environment Map

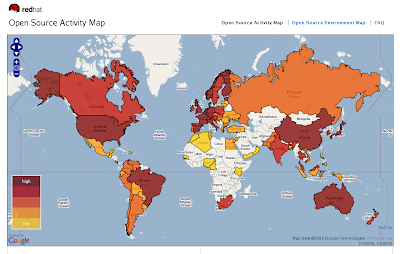
About this Map

Explore open source software hotspots around the world through the interactive Open Source Index, or OSI, based on research by the Georgia Institute of Technology (Georgia Tech). The OSI is a measure of the open source activity and environment in 75 countries. Each country is given a score based on its policies, practices, and other data in the fields of Government, Industry, and Community.

Click on a country to see the country's rank (1 being the highest, 75 being the lowest) in open source activity. One map shows Activity, which measures the amount of open source happening today. It tends to be made up of concrete factors, such as existing open source and open standards policies and number of OSS users, such as Linux and Google.

You can also see an Environmental map, which is more speculative. Even a country that does not have a high degree of current penetration of open source may have a high number of internet users and information technology patents. These factors may indicate a favorable environment for open source software to take hold.

About the Popups

When you click on a country, you can see its overall rank among the 75 countries in the index, as well as its rank for Government, Industry, and Community factors. Government factors include open source procurement policies and support for open source. Industry factors include the number of registered OSS users per capita and internet growth. Community factors include the number of applications to the Google summer of code, native language support for GNU/Linux, and number of Internet users per capita.

We encourage you to explore, learn, then improve or build off the Open Source Index. This work is a resource and just the beginning. Analyze the results here or gather the data and change the construction. Whatever you do, share it with the rest of us.

Source: http://www.redhat.com/about/where-is-open-source/activity/

Tuesday, June 2, 2009

Sun xVM VirtualBox


You are MS Windows user and you are about to give a chance to GNU/Linux, but repartitioning your hard drive is a bit difficult and you need time to do this. You are reading the right post now. It is possible to install Slackware and other GNU/Linux operating systems on MS Windows as guest operating system through Sun xVM VirtualBox which is a powerful virtualization program freely available as Open Source Software under the terms of the GNU General Public License (GPL). VirtualBox not only run on Windows hosts but also runs on Linux, Macintosh and OpenSolaris hosts and you can install one or more operating systems as guest on host operating system through VirtualBox. I have guest Slackware and guest Ubuntu on my host Slackware. This guest Slackware is my cavy for experimental use :). My brother also has a guest MS Windows XP installation on his Slackware box, because he needs MS Windows XP for the CAD/CAM software which has only Windows version. This software is preferred by his department for Computer Aided Drawing course.

Installation of VirtualBox is quite easy. Just download the binary package for your OS from the download page of VirtualBox and install it. For detailed installation instructions look at user manual on download page.

For Windows; download "VirtualBox-x.x.x-xxxxx-Win.exe" and just by clicking executable file complete the installation by the guidance of graphical windows installer.

There is no native binary package for Slackware on download page, but there is a binary package (*.run) for all Linux distributions. Download the executable binary package "VirtualBox-x.x.x-xxxxx-Linux.run" and execute file as root by

# ./VirtualBox-x.x.x-xxxxx-Linux.run

or

try to build VirtualBox package from SlackBuilds.org.

After installing VirtualBox, launch the program and start to build your virtual machine by clicking "New" button. First choose VM (Virtual Machine)
name and OS (Operating System) type, then set RAM size, create virtual HDD setting its size and finalize VM creation. Now using "Settings" menu for VM you have created, enable CD/DVD Drive, Floppy, USB and Audio and set video memory size. Be careful on that total virtual RAM and virtual video memory size must be consistent with size of your physical RAM. If total value of the size you assigned for VM's RAM and video memory exceeds the size of physical RAM, your computer get stuck. You can assign physical CD/DVD Drive or ISO Image as virtual machine's CD/DVD Drive, it depends on from which medium you will run guest OS installation. To install a guest OS on your VM, place installation medium, mount it and start VM. After some seconds VM will boot from bootable installation medium that you have inserted. Start installation and finish. After starting guest OS, do not forget to install "Guest Additions" package on guest OS for improvements.

Enjoy!


Monday, June 1, 2009

Printing in Slackware with CUPS


Common UNIX Printing System (CUPS) is the default printing subsystem in Slackware. Latest stable Slackware release (12.2) includes Gutenprint package which is a suit of printer drivers and may be used with CUPS.

To install a printer using CUPS under Slackware:

1. Start CUPS service by

# chmod +x /etc/rc.d/rc.cups

# /etc/rc.d/rc.cups start

or using pkgtool add CUPS to startup services to run.

# pkgtool


(Setup > Services > CUPS Print Server).


2. Connect your printer to computer and reboot system.

3. Connect to CUPS Panel by browsing http://localhost:631/

4. Click on "Add Printer".

5. Describe your printer, choose class and model.

6. Entering root user name "root" and password, finalize printer installation.

For detailed information look at Documentation/Help.